Border collie
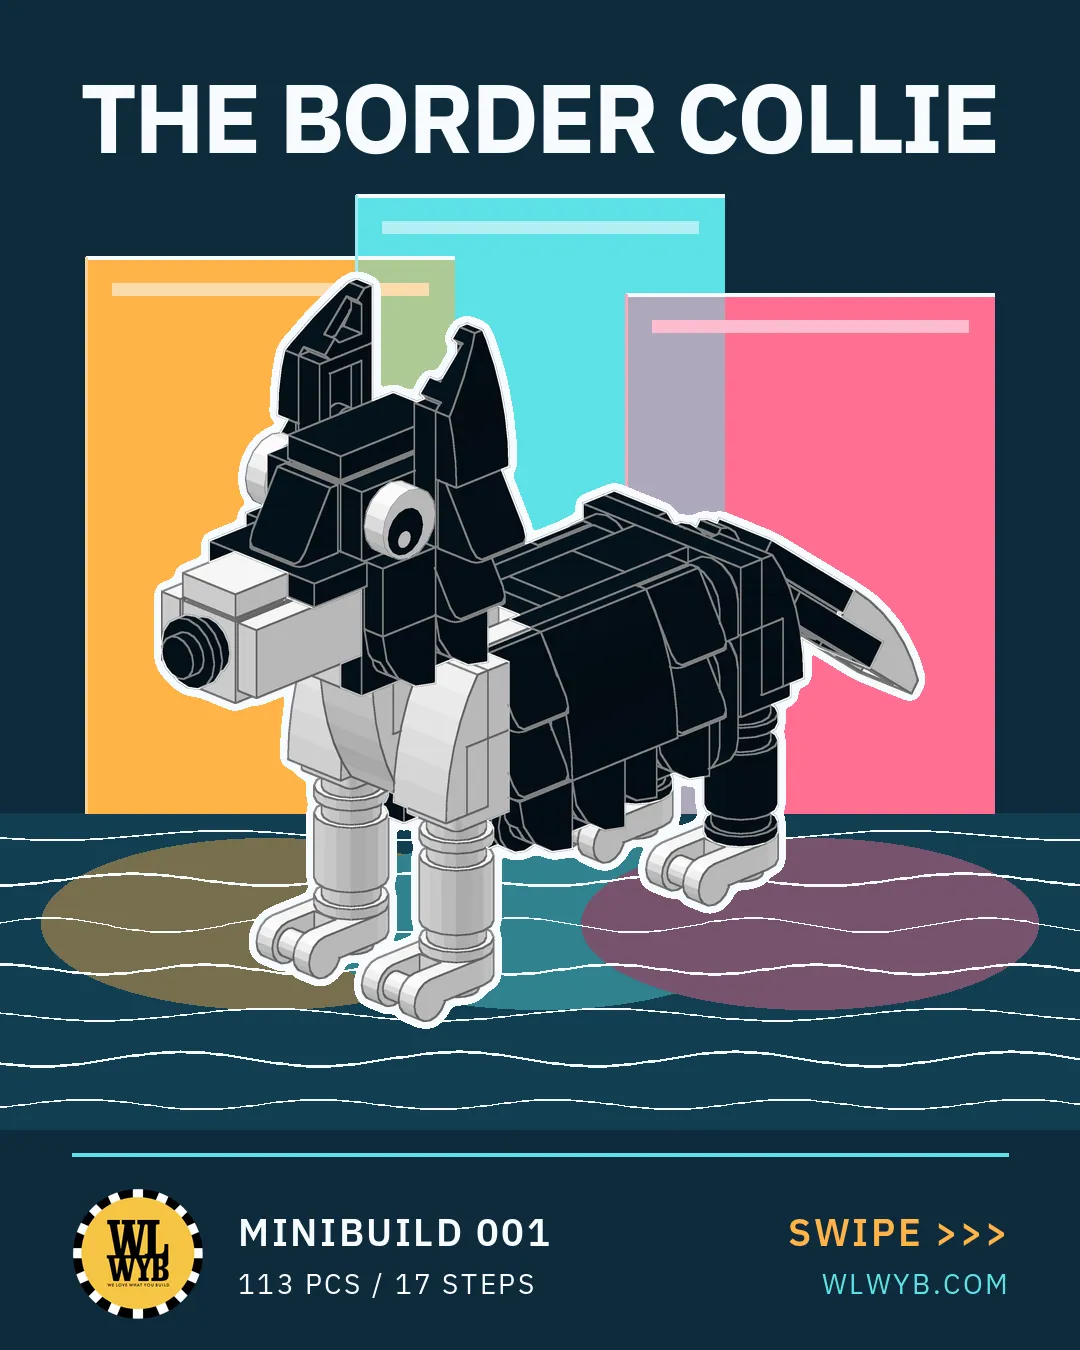
A small border collie built from LEGO® bricks, standing with its tail out, in 17 steps and 113 pieces.
Free building instructions for small models built from LEGO® bricks.
Steps
Parts and steps as text
Everything the slides show, in words.
The steps as text
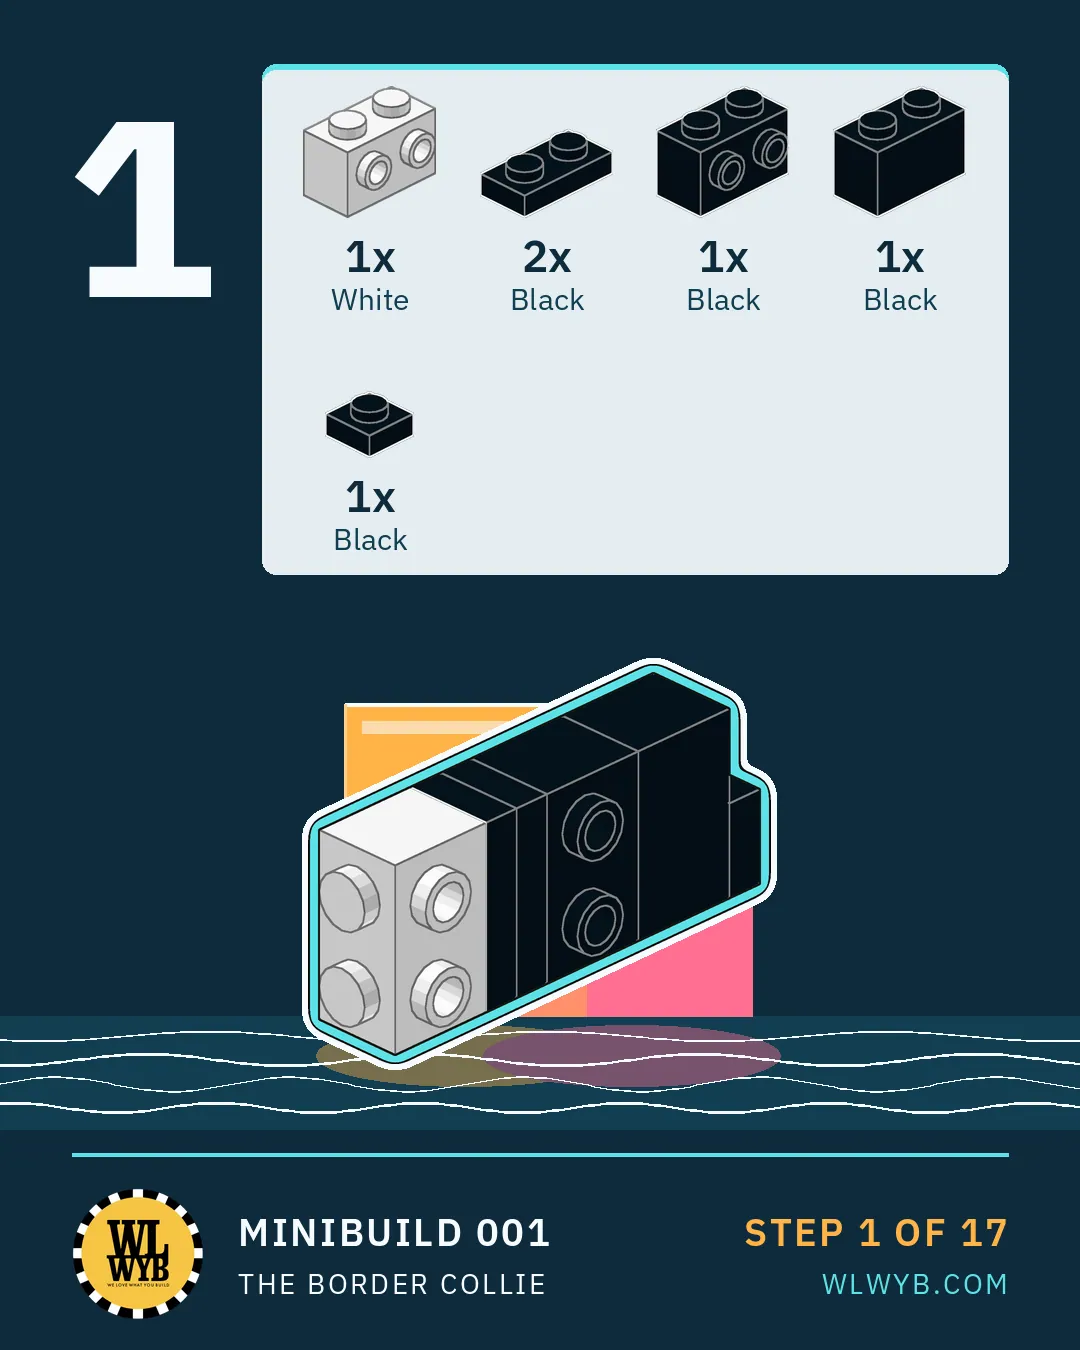
- Step 1 Start the body with the bricks with studs on the sides and the plates, white at the front. (6 parts)
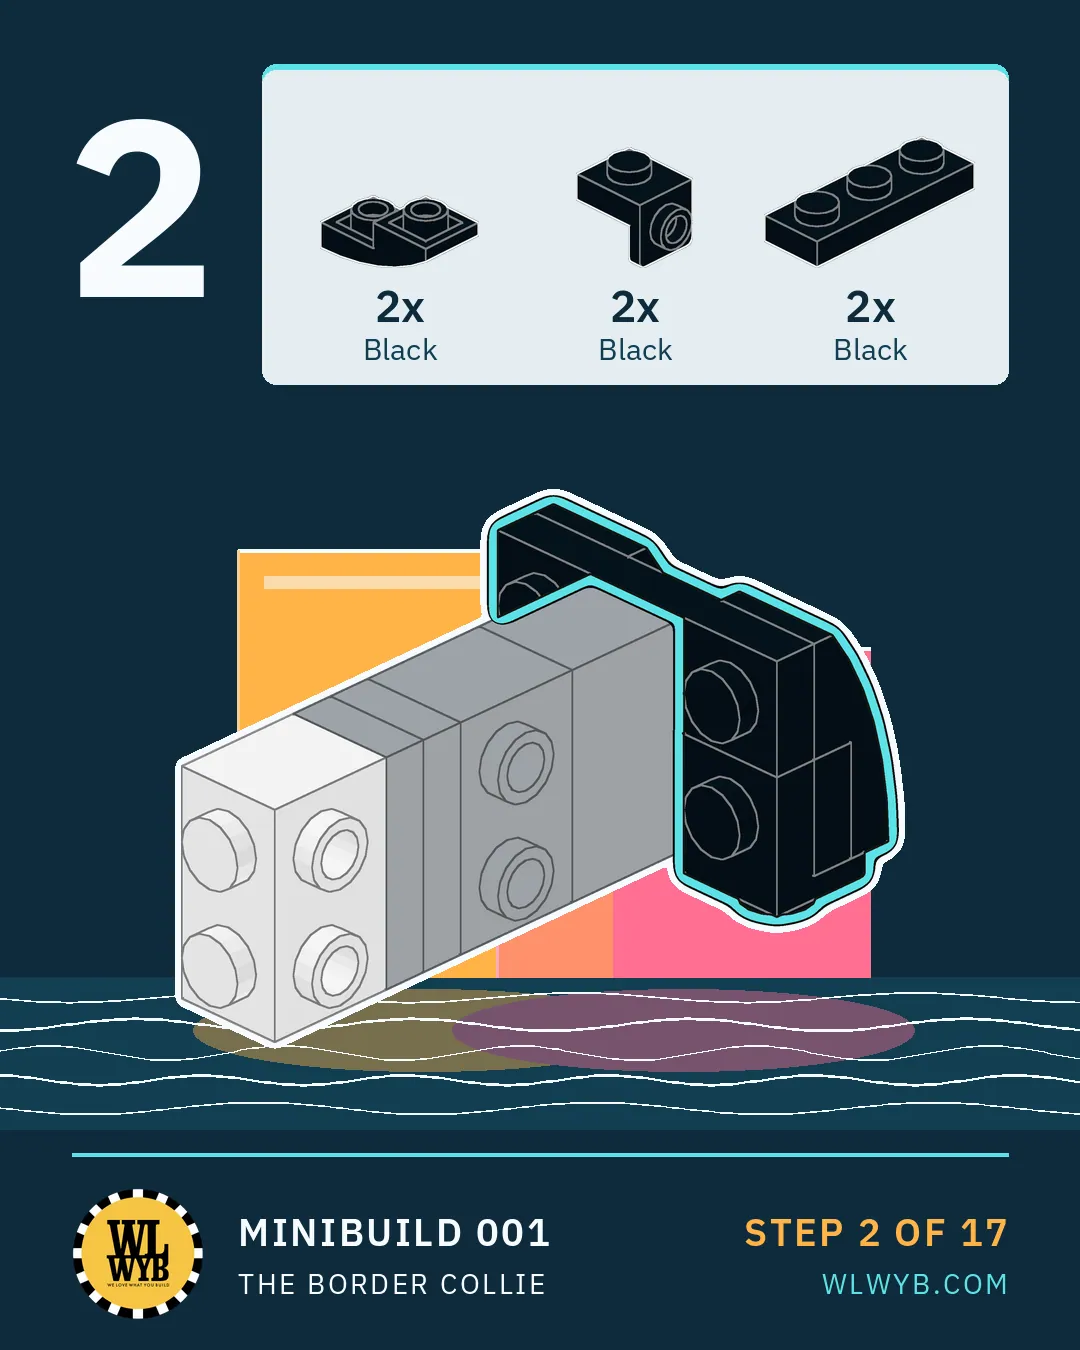
- Step 2 Add the brackets, the inverted curved slopes and the 1 x 3 plates. (6 parts)
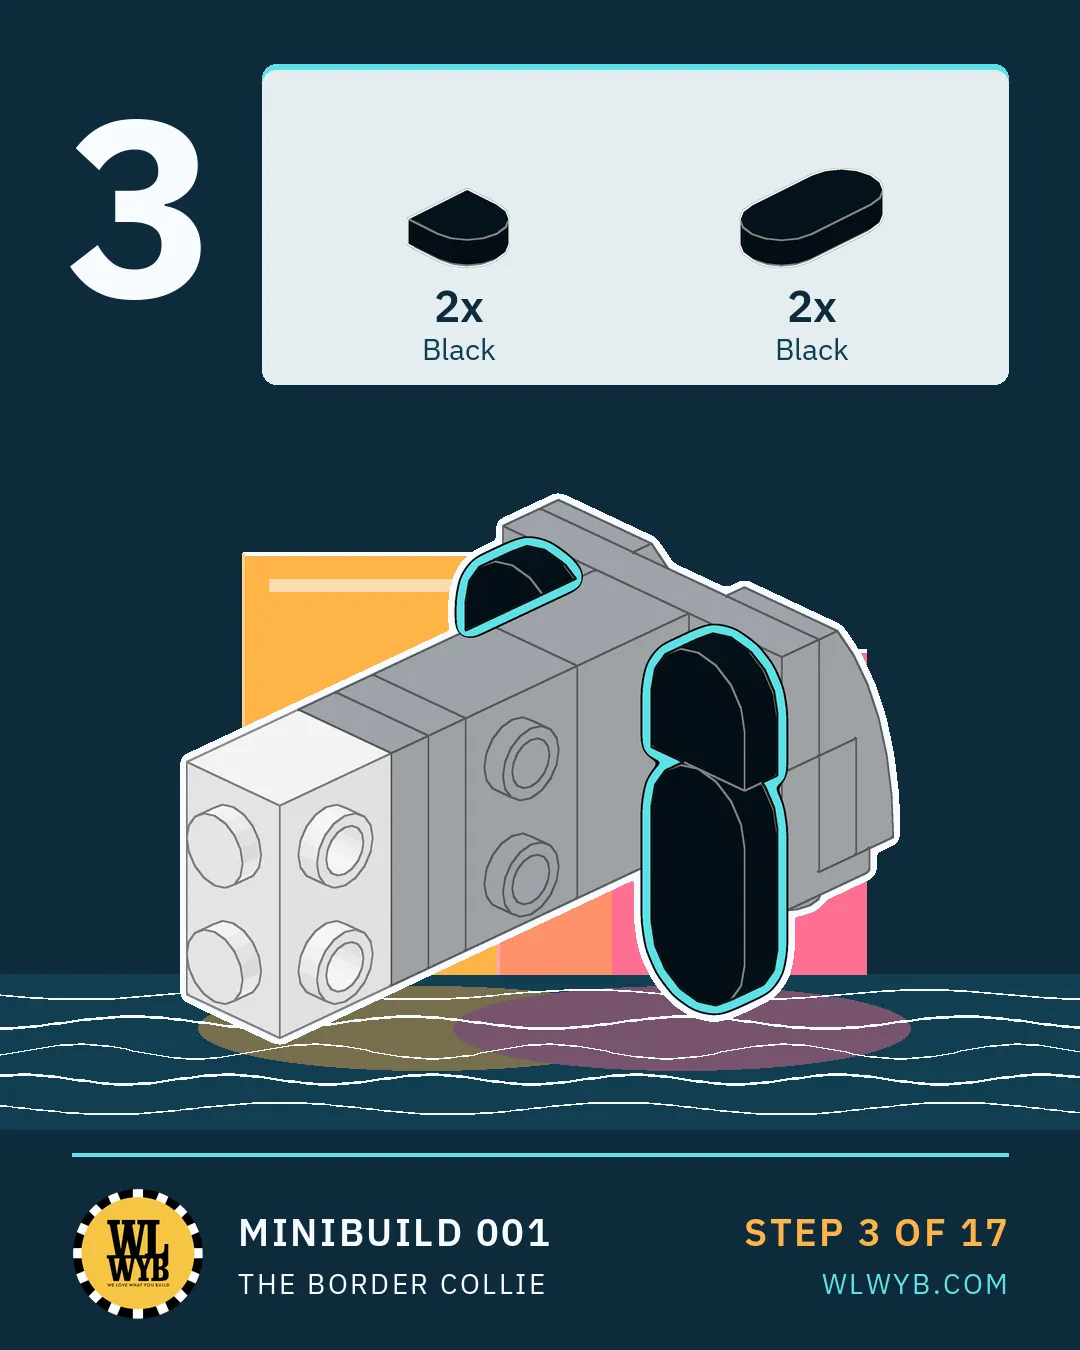
- Step 3 Add the oval and half circle tiles on the sides. (4 parts)
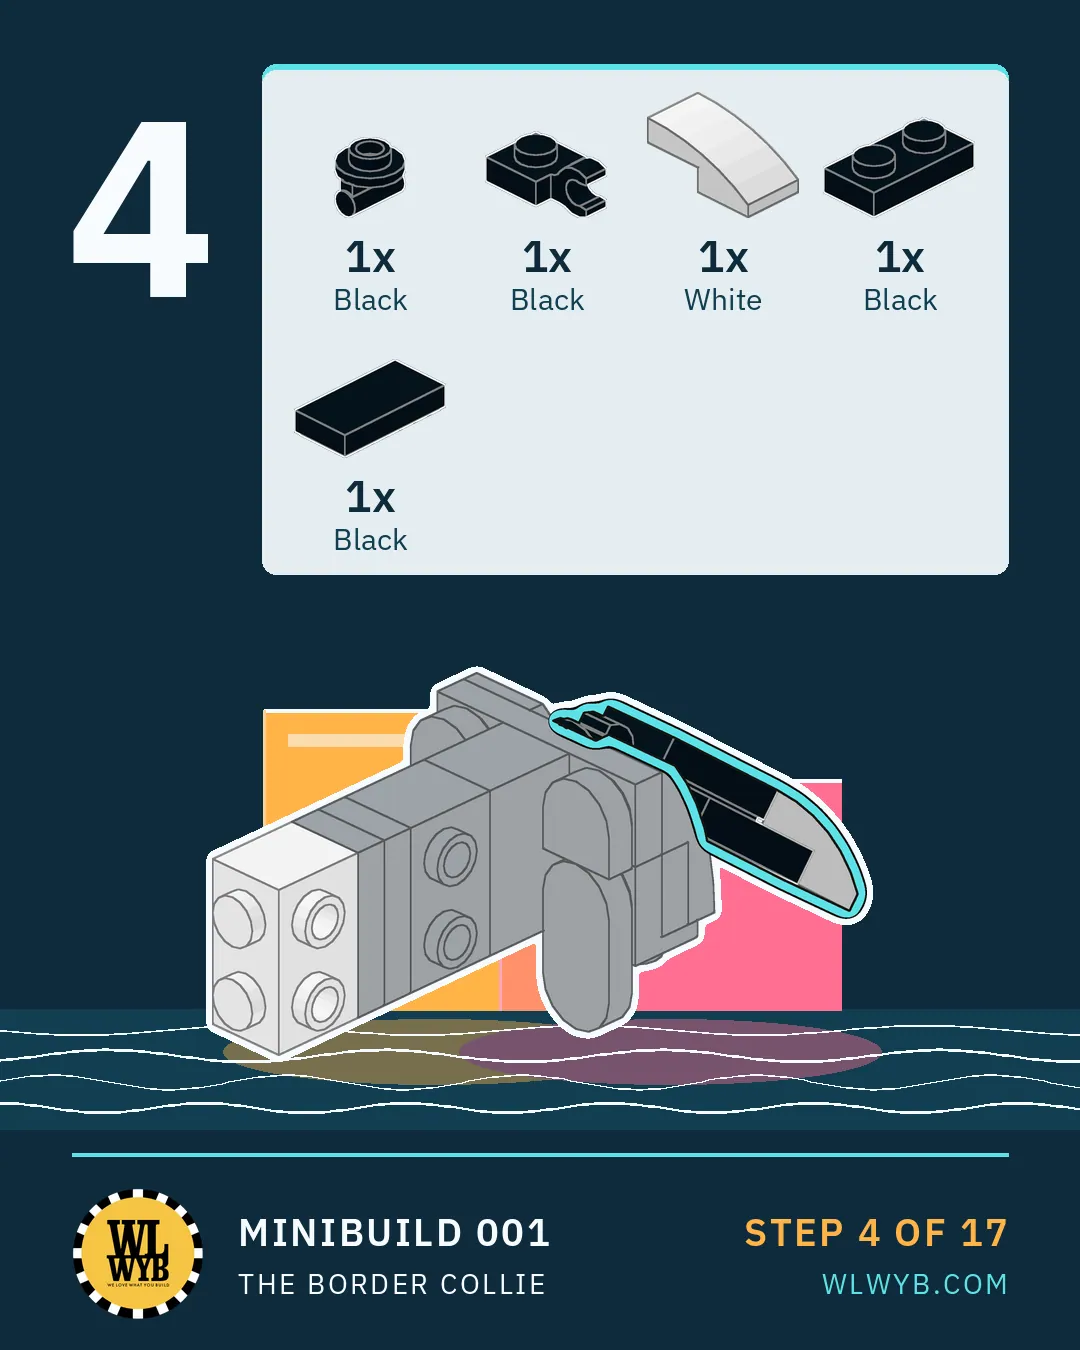
- Step 4 Build the tail at the back: a round plate with a bar, a clip, and the white tip. (5 parts)
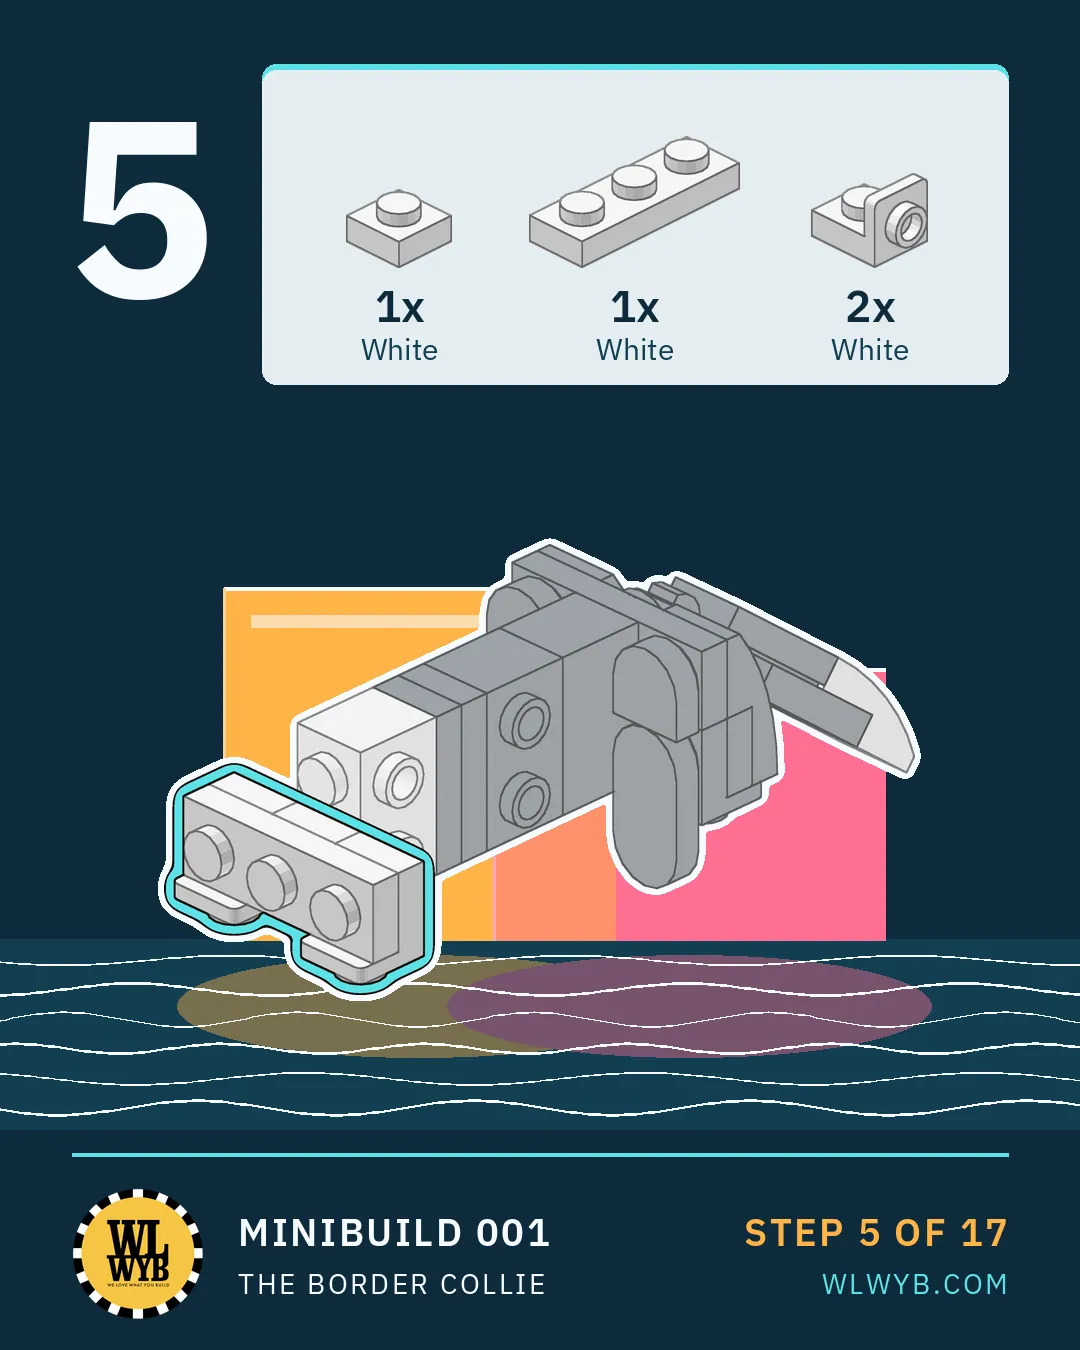
- Step 5 Add the white plates and the inverted brackets at the front. (4 parts)
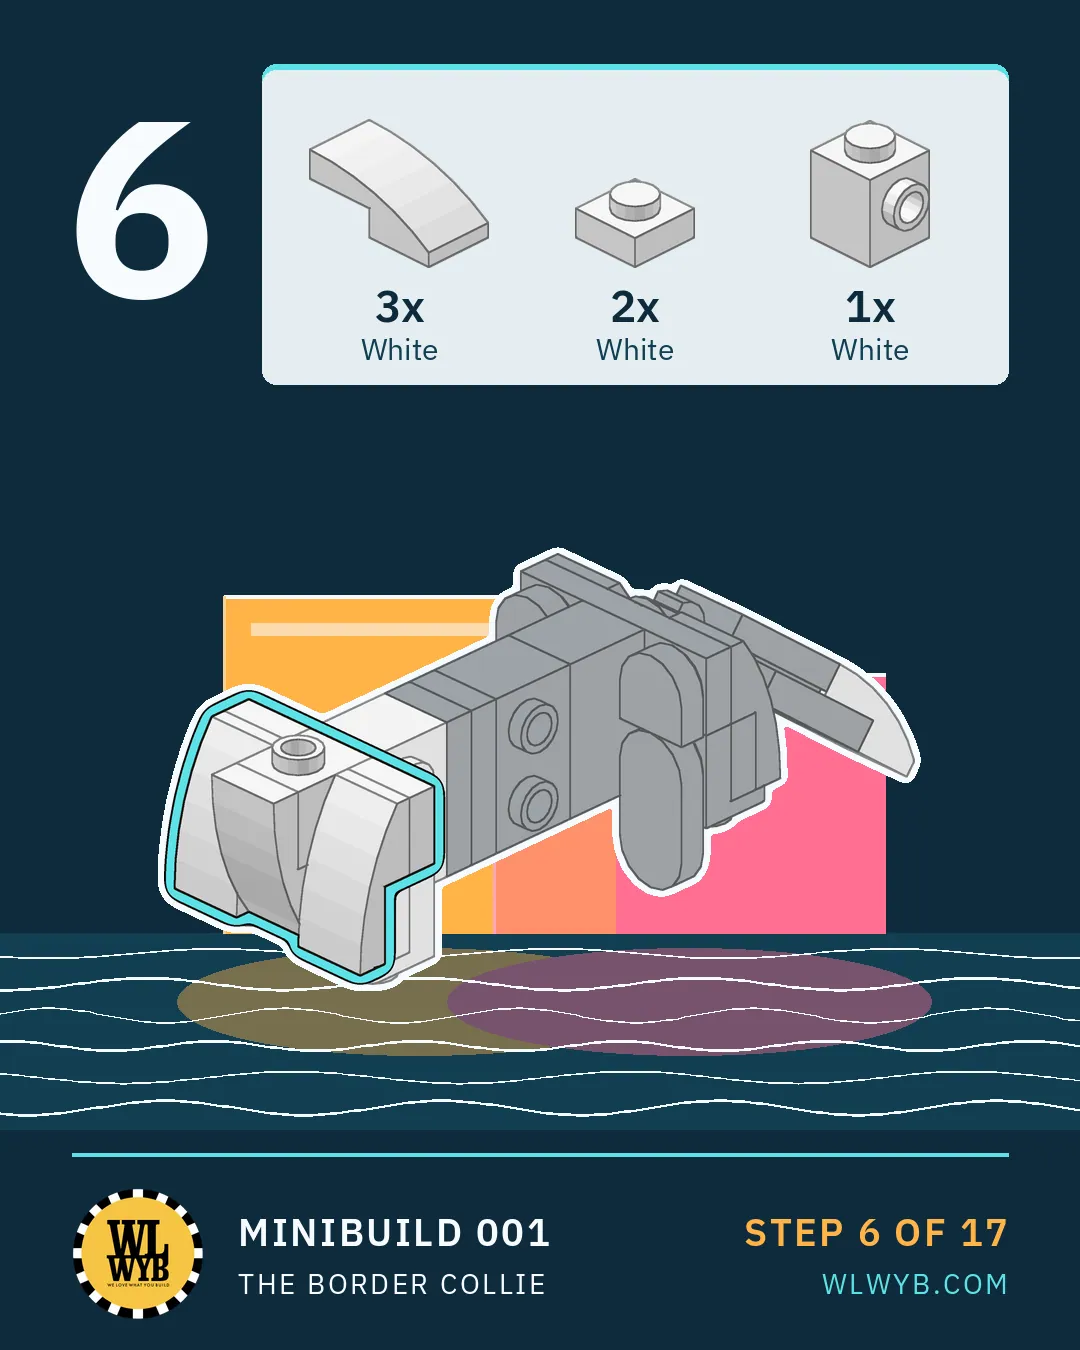
- Step 6 Cover the chest with white curved slopes. (6 parts)
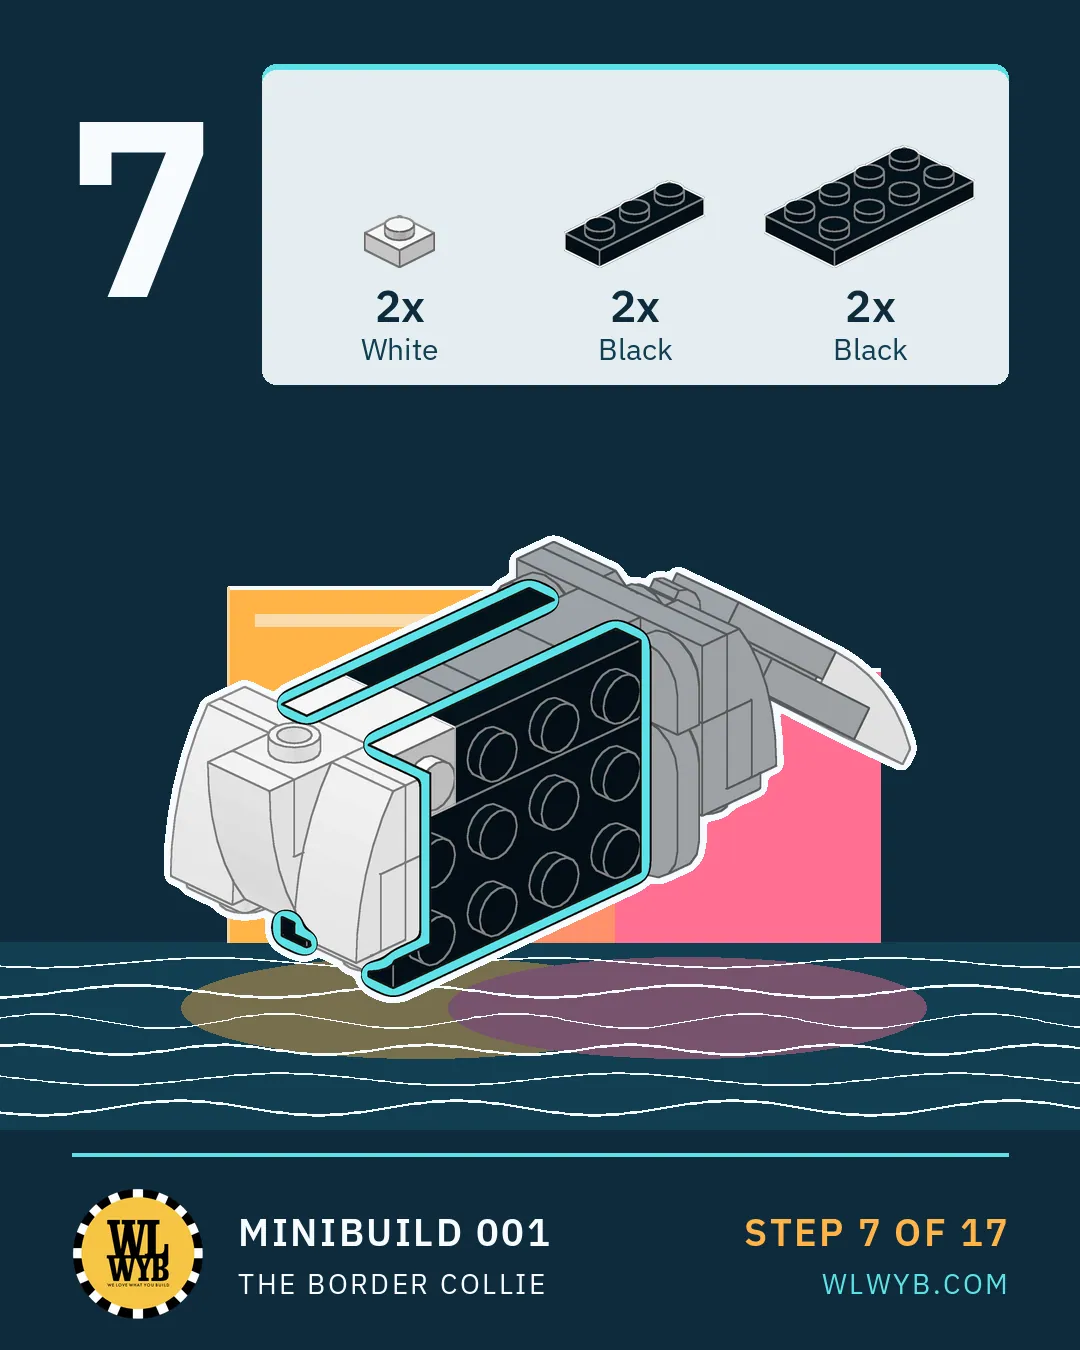
- Step 7 Add the 2 x 4 plates on top of the back. (6 parts)
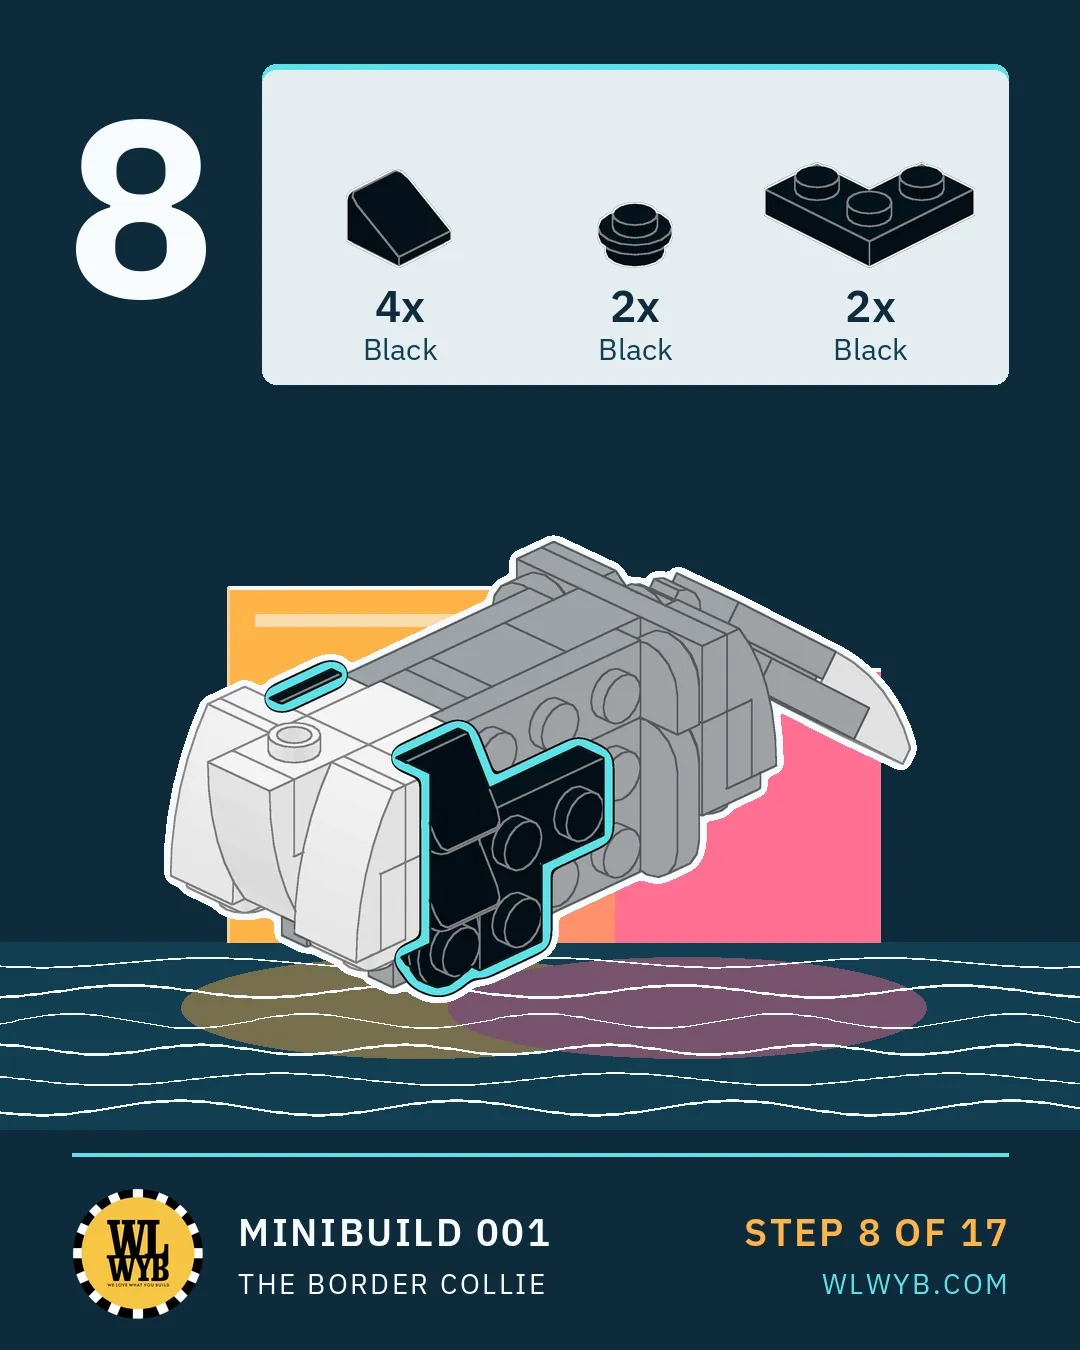
- Step 8 Add the slopes, the round plates and the corner plates. (8 parts)
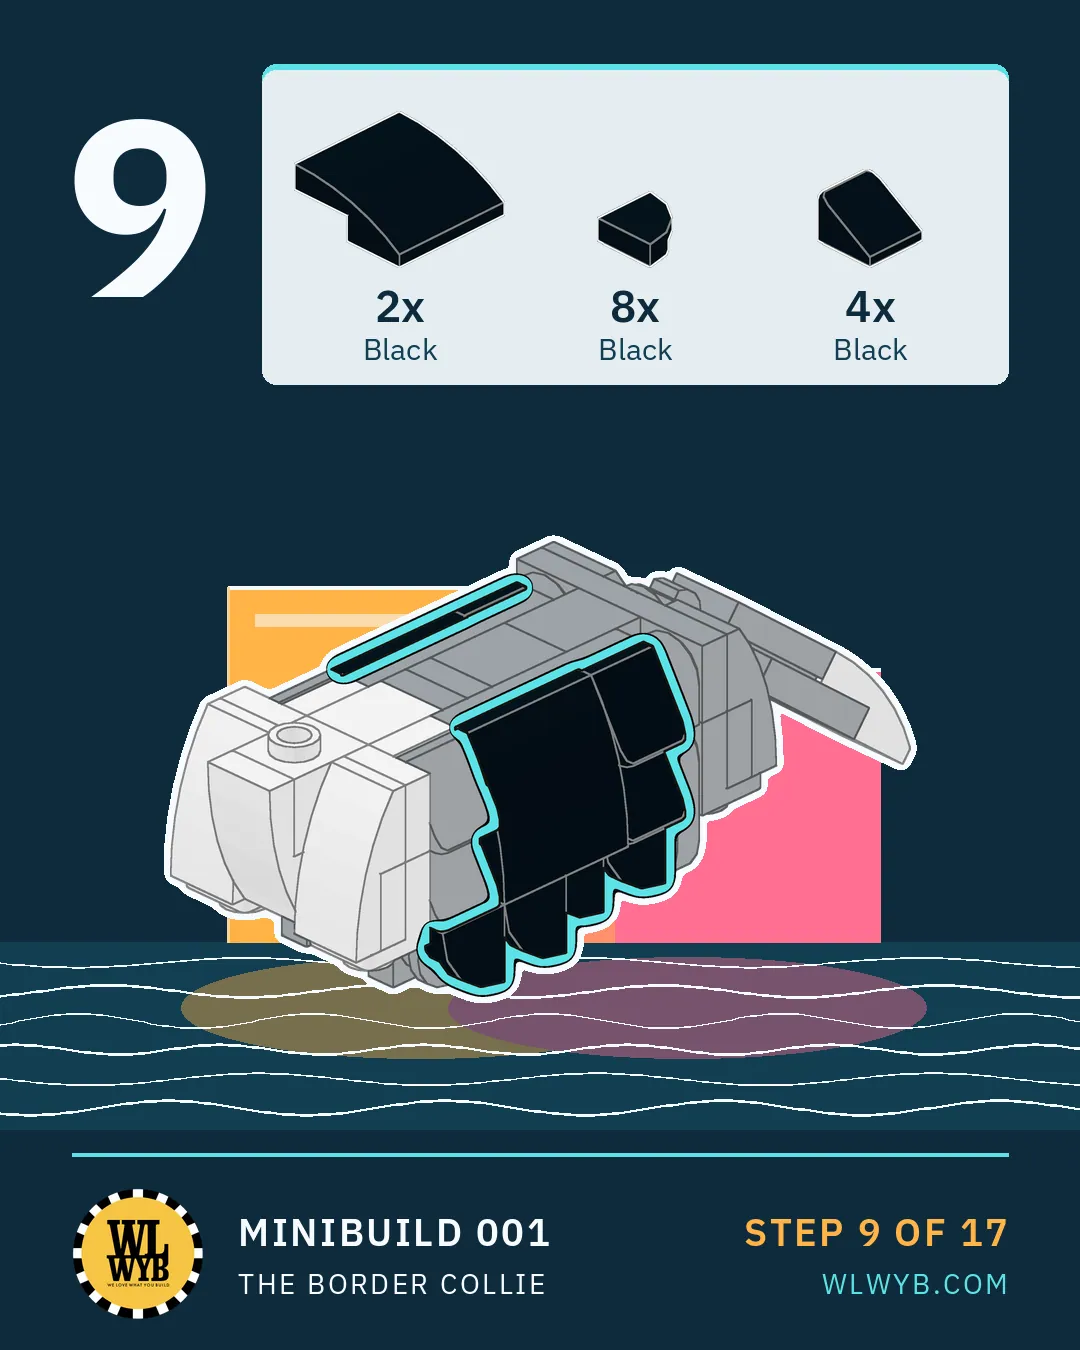
- Step 9 Cover the back with curved slopes, quarter round tiles and slopes. (14 parts)
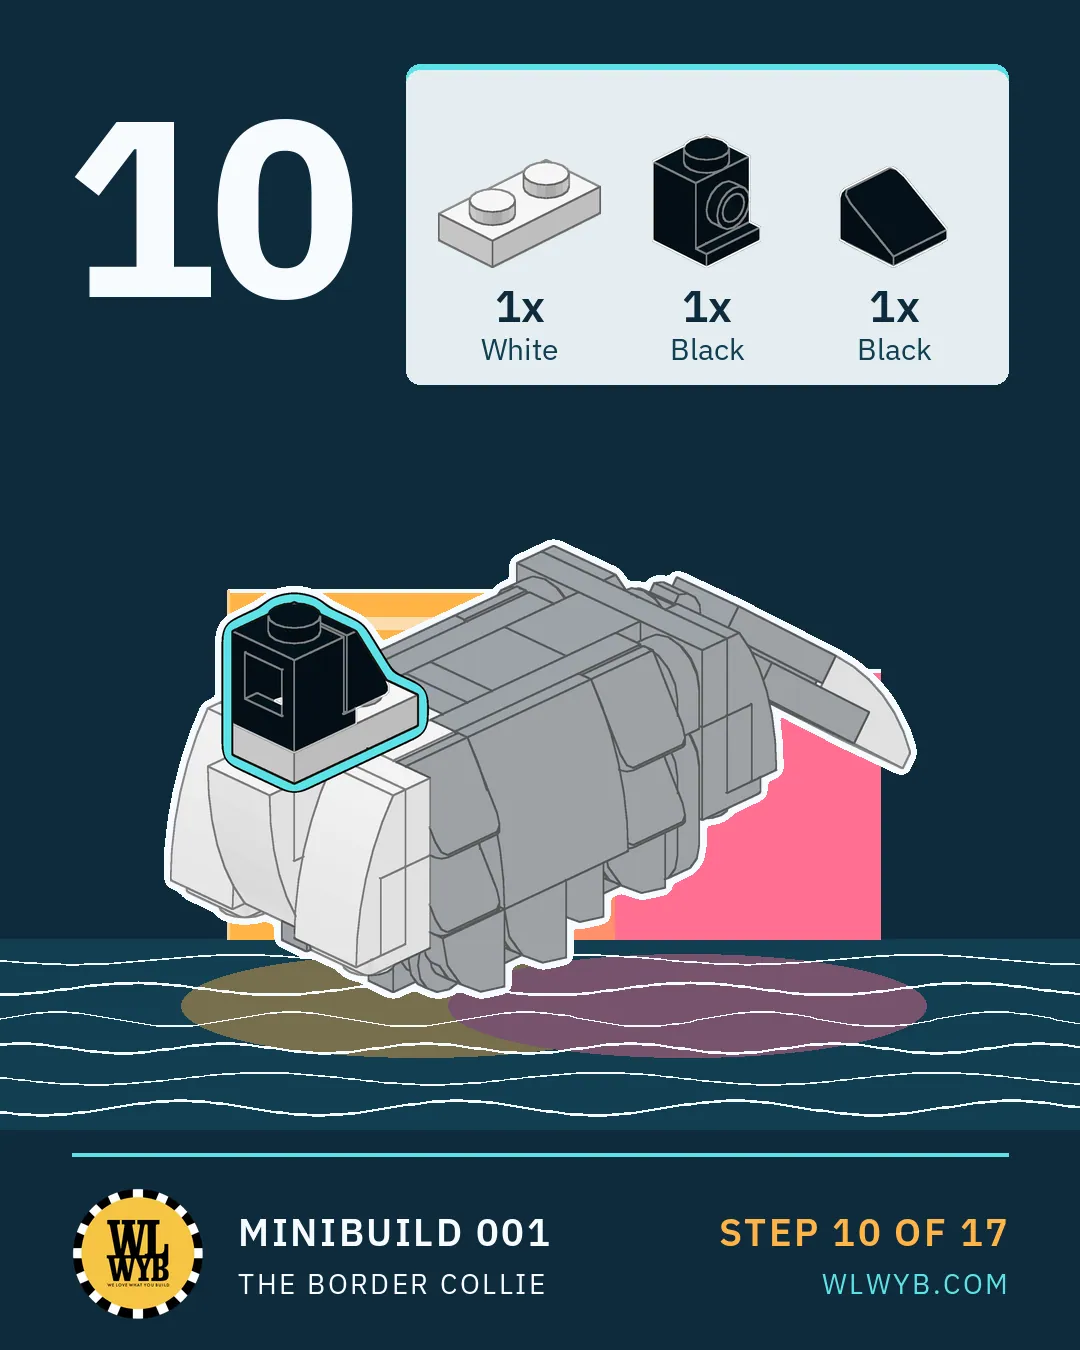
- Step 10 Start the head at the front with a headlight brick, a white plate and a slope. (3 parts)
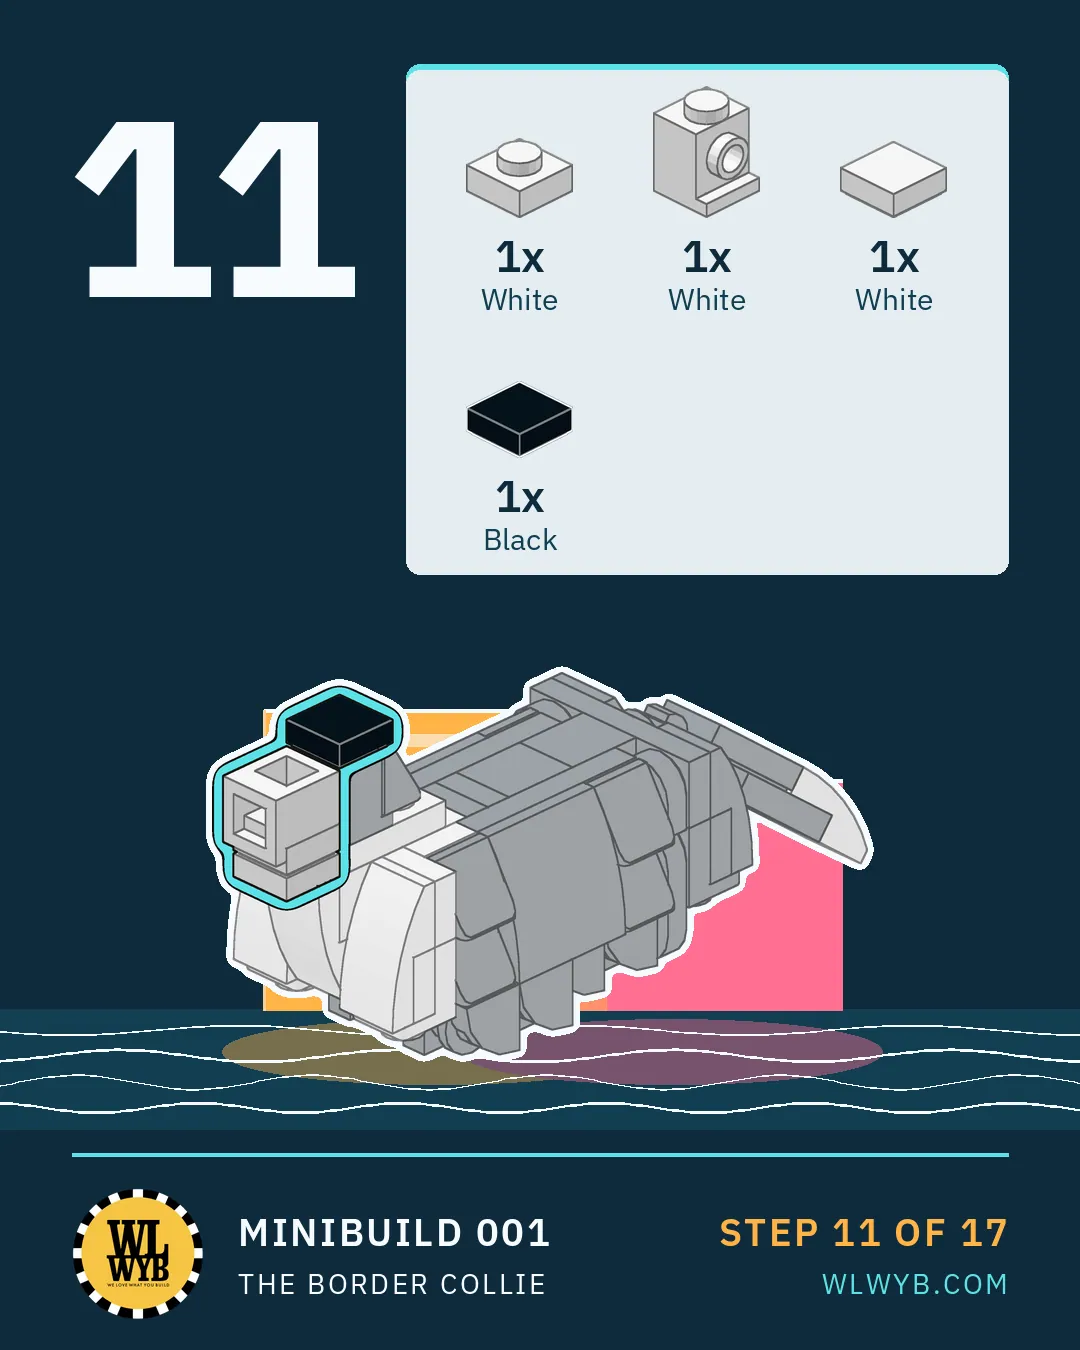
- Step 11 Add the white headlight brick and the tiles of the muzzle. (4 parts)
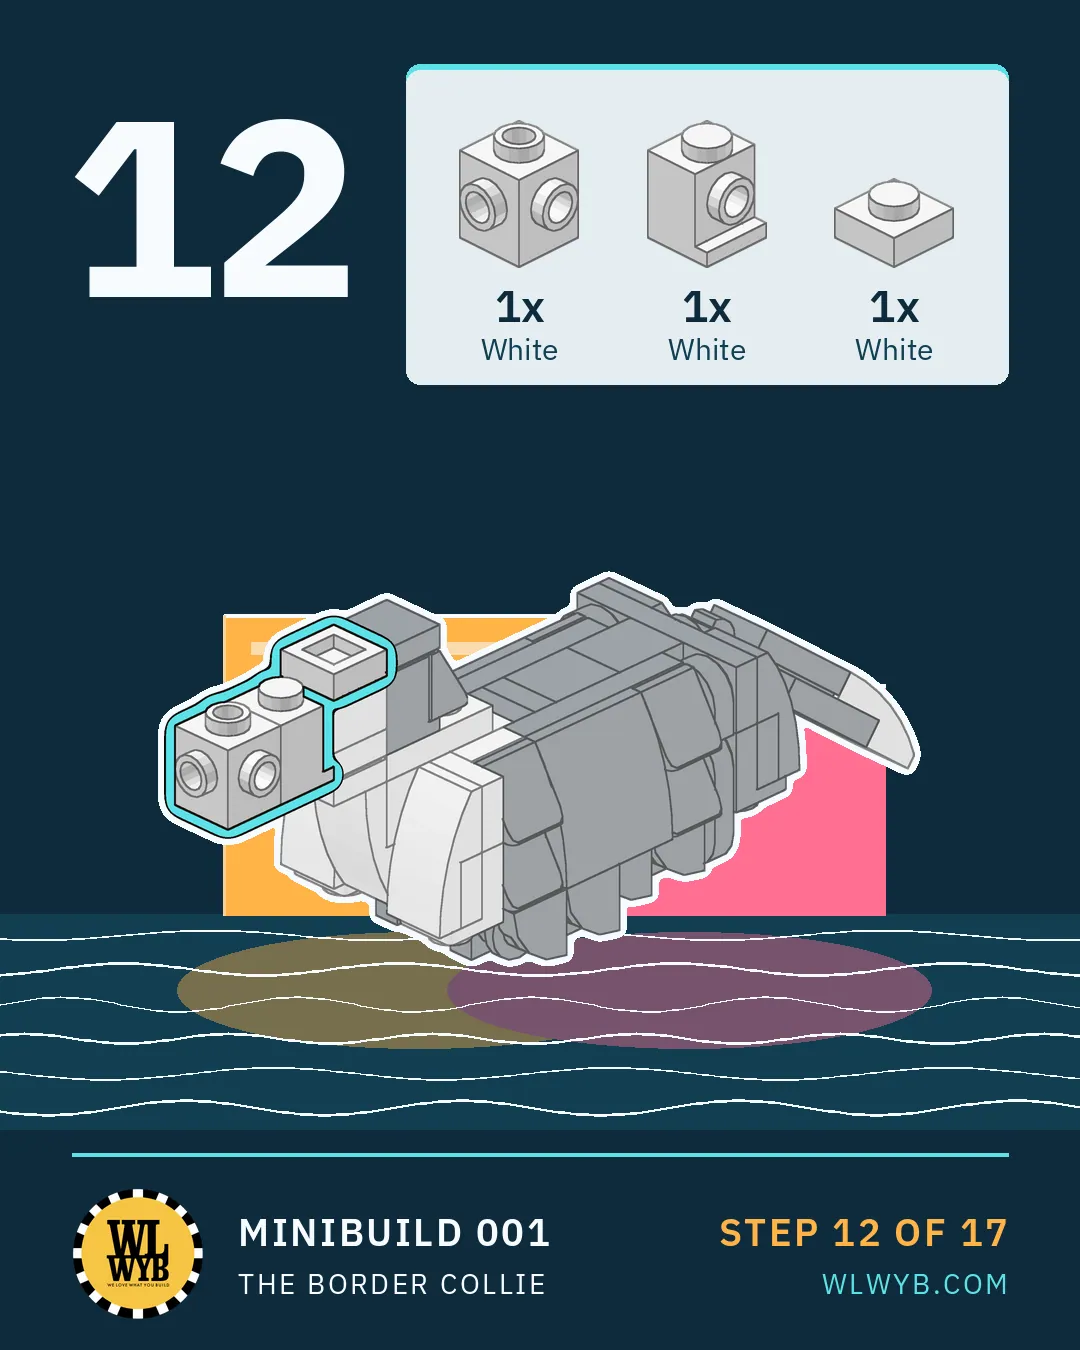
- Step 12 Add the brick with studs on 4 sides for the nose. (3 parts)
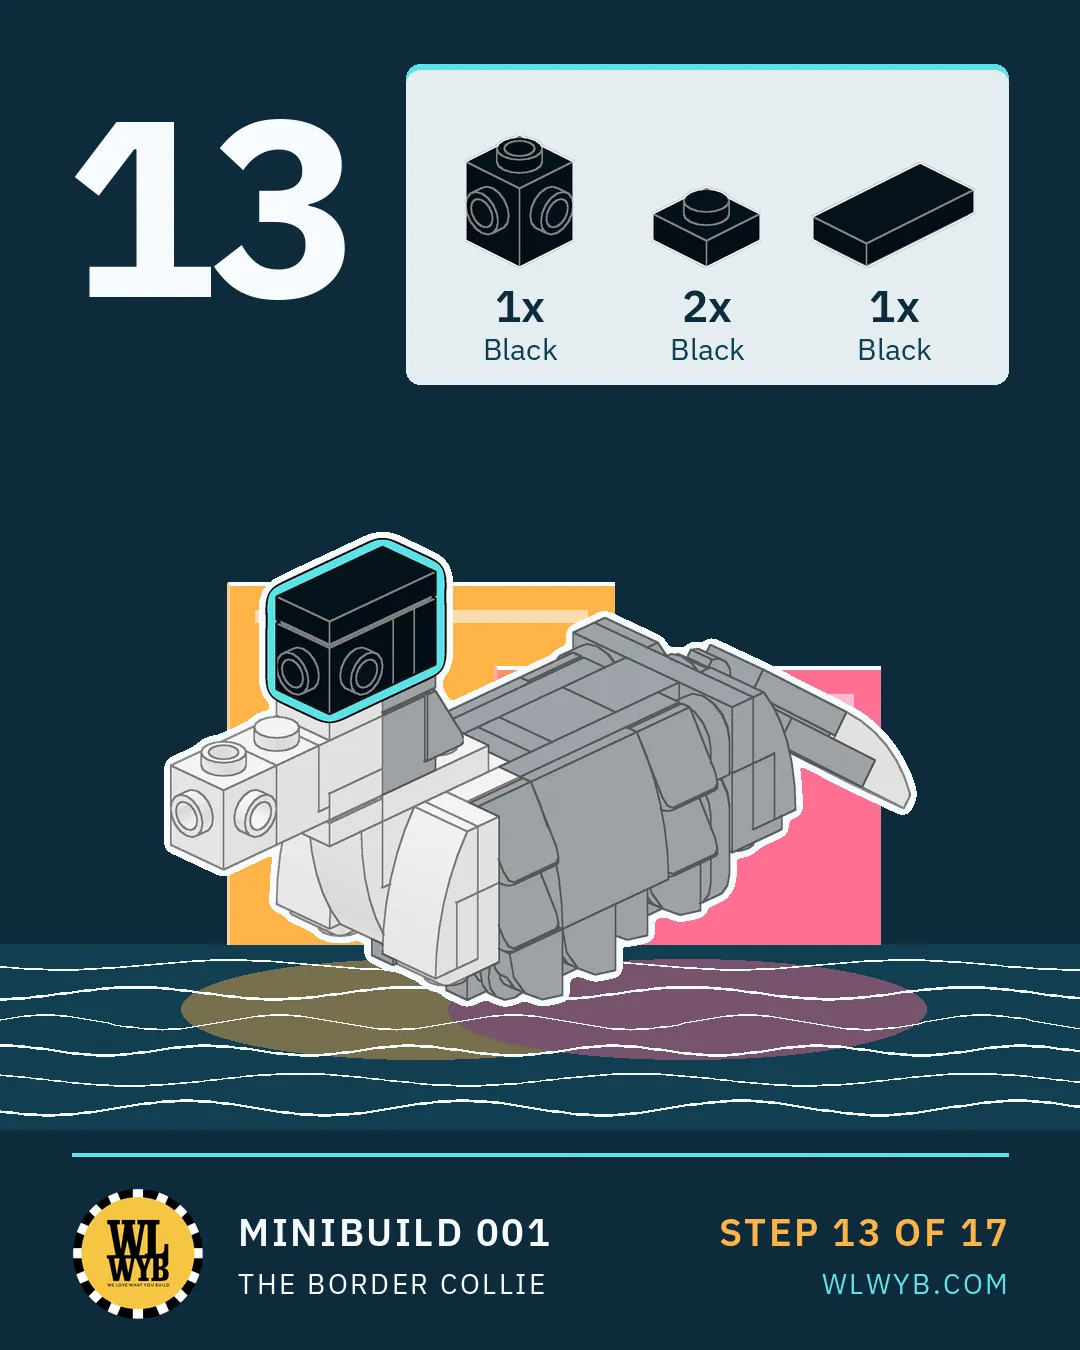
- Step 13 Build up the top of the head with black plates and a tile. (4 parts)
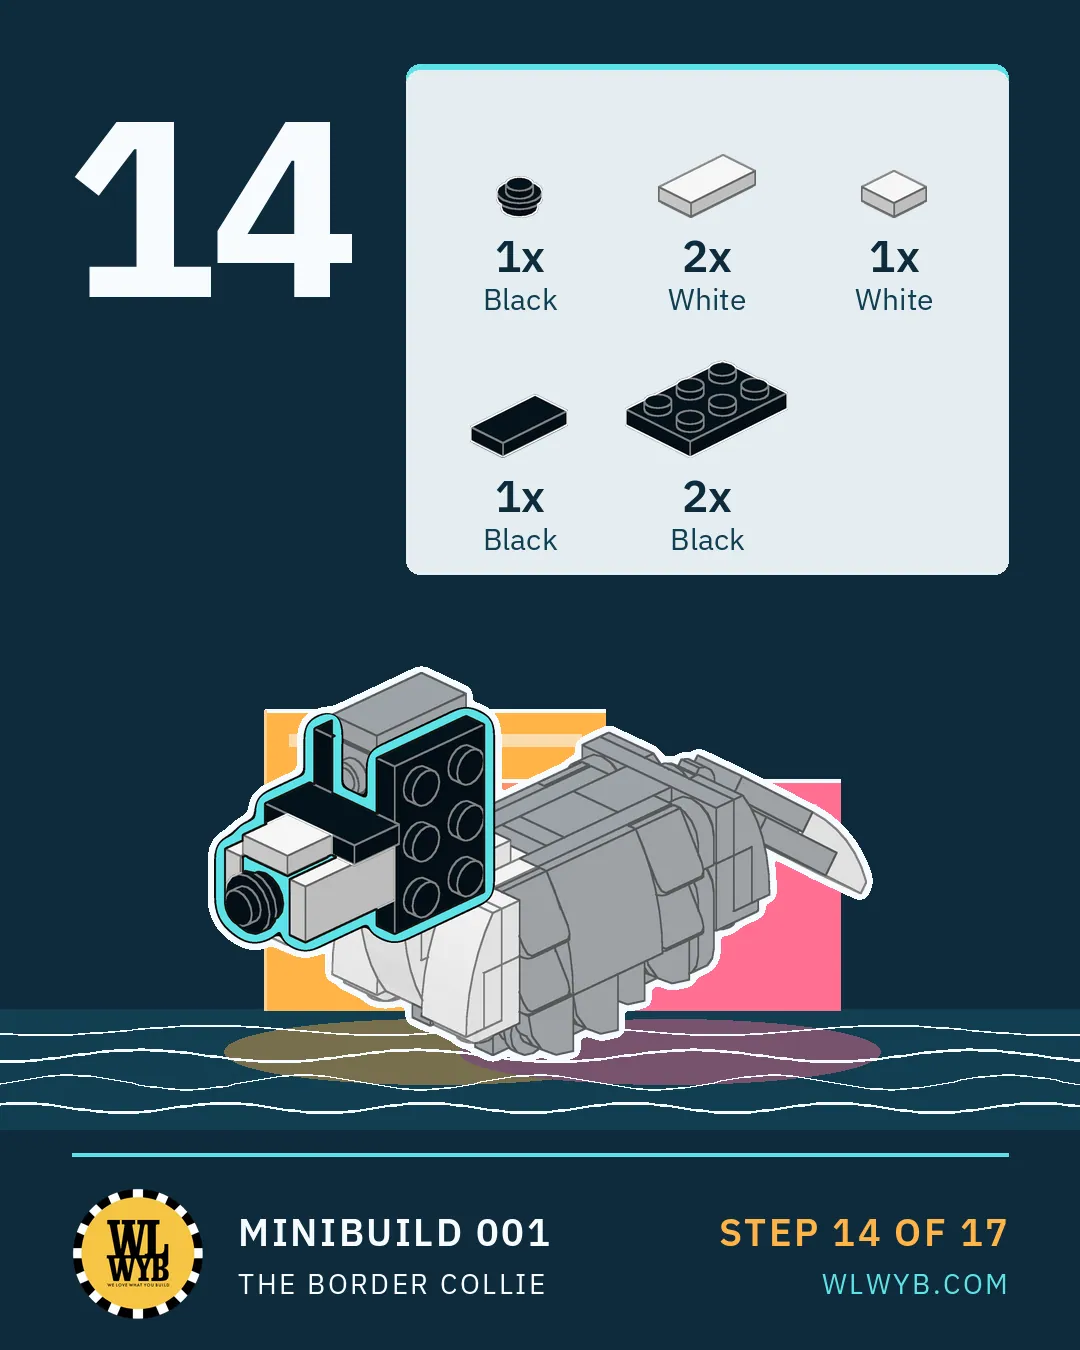
- Step 14 Add the 2 x 3 plates and the tiles on the head. (7 parts)
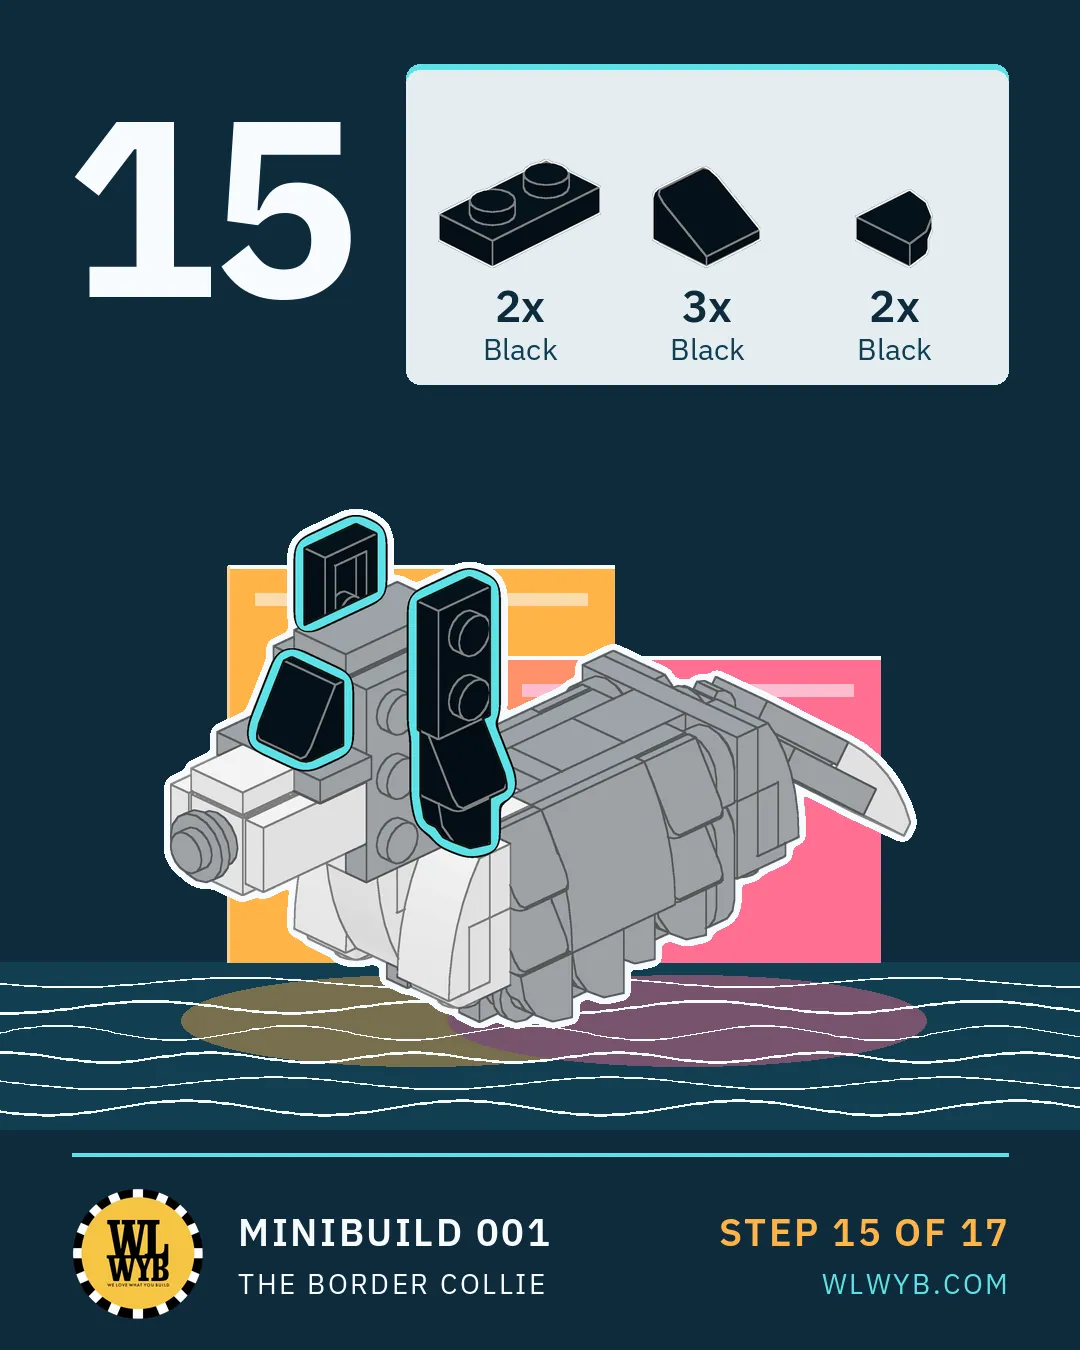
- Step 15 Add the slopes and quarter round tiles of the ears. (7 parts)
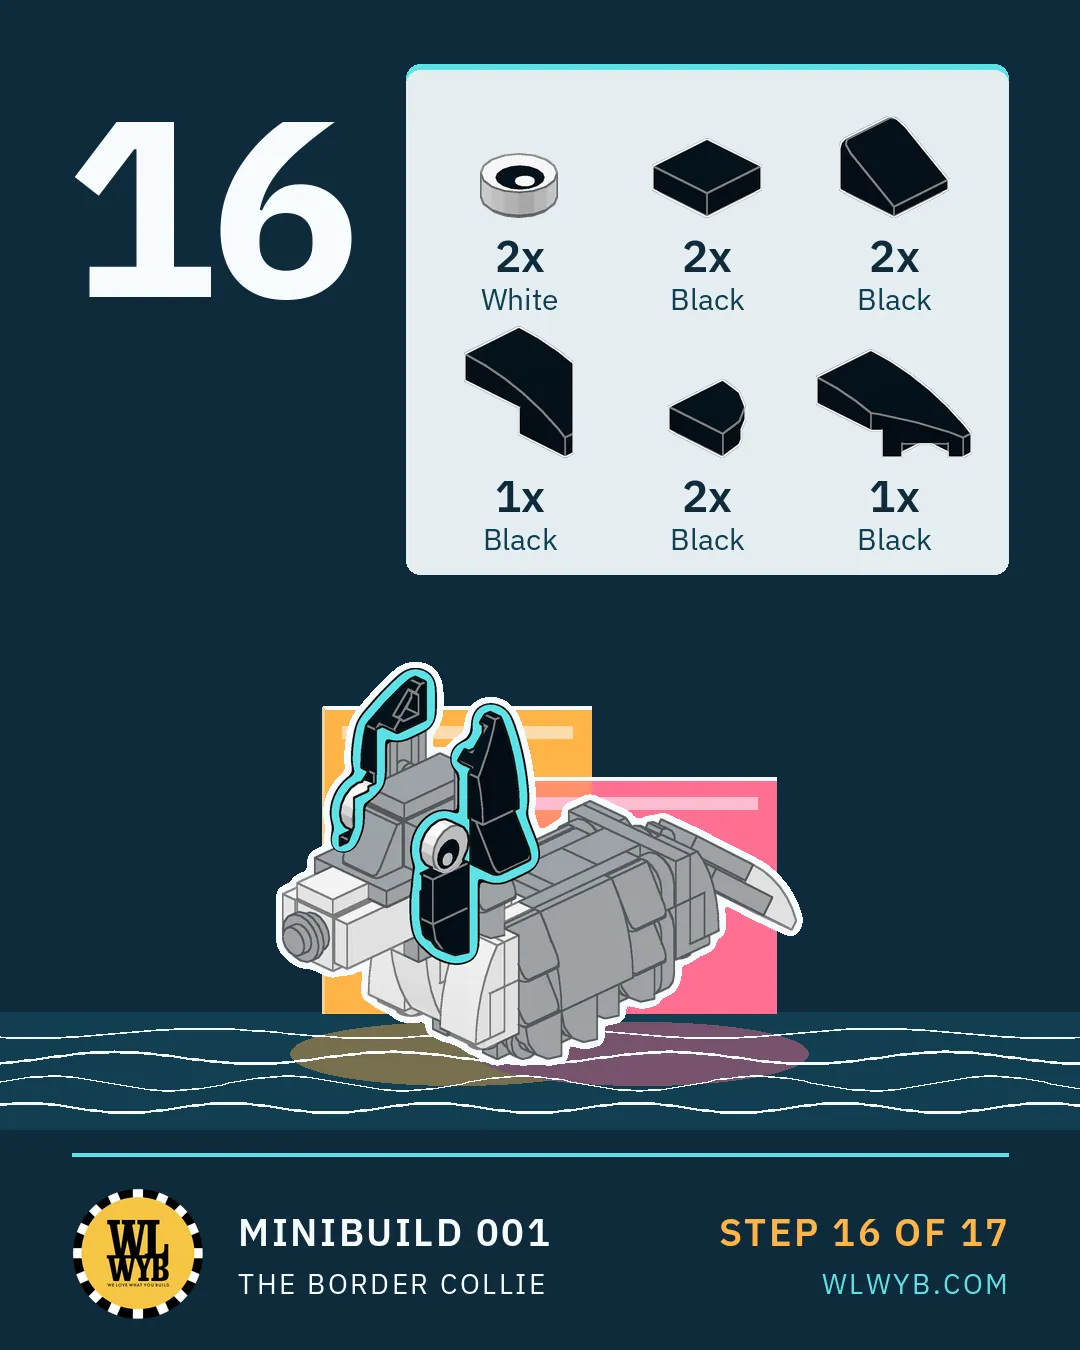
- Step 16 Add the eyes, the wedges and the last slopes and tiles. (10 parts)
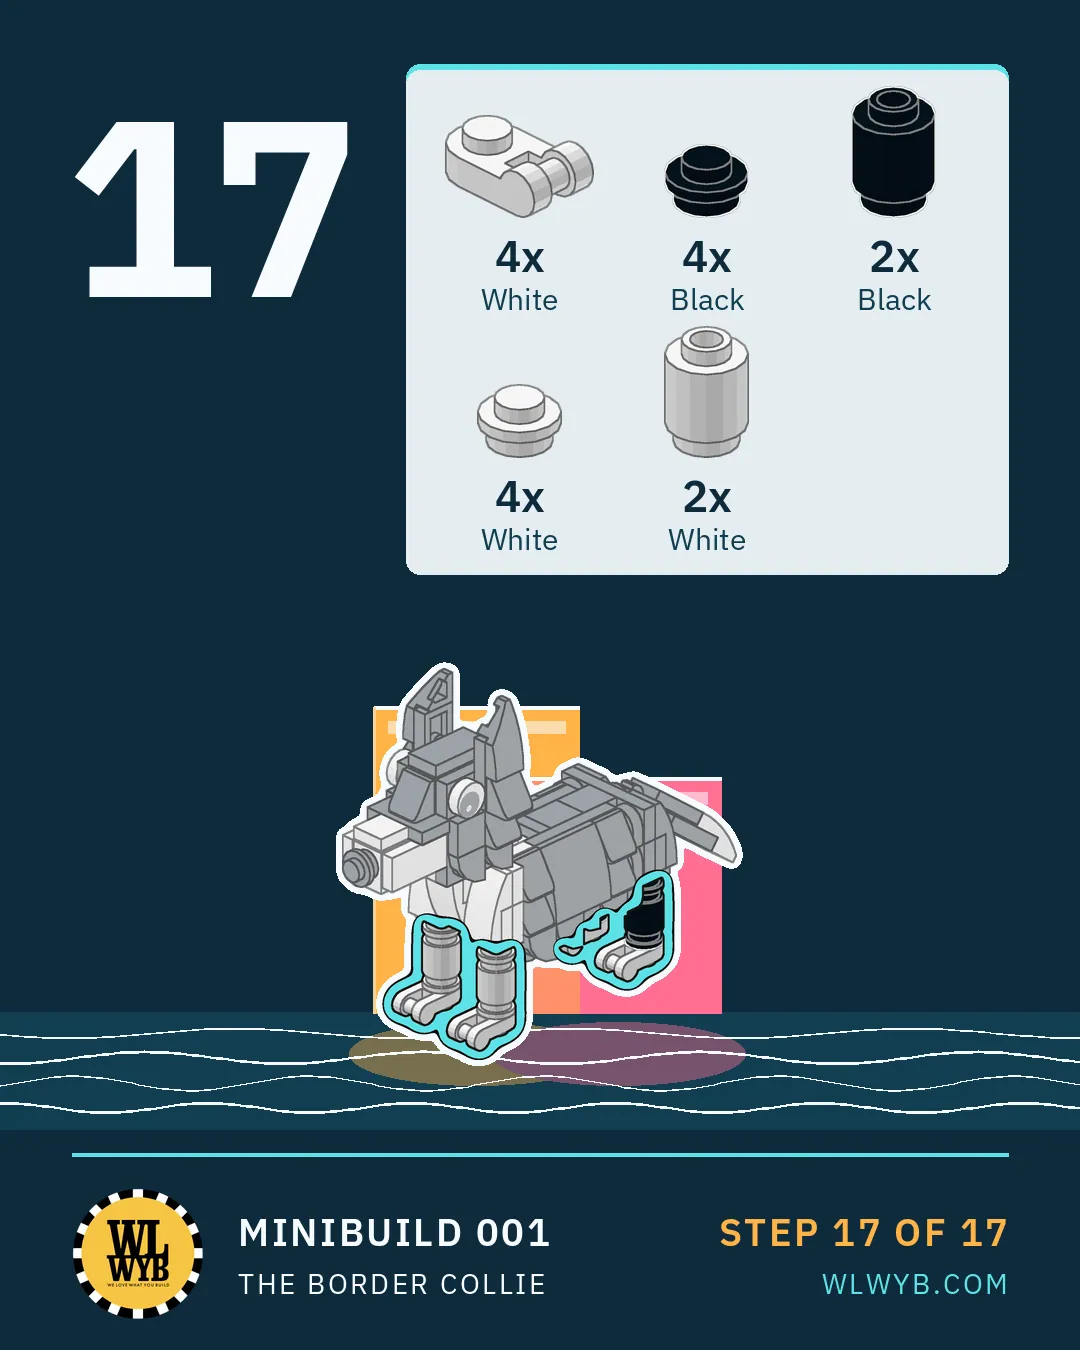
- Step 17 Build the four legs with round bricks and round plates underneath. (16 parts)
The parts list, 113 pieces in total
- 2 x Tile, Round 1 x 2 Oval, Black1126
- 4 x Slope, Curved 2 x 1 x 2/3, White11477
- 2 x Slope, Curved 2 x 2 x 2/3, Black15068
- 2 x Plate 2 x 2 Corner, Black2420
- 2 x Slope, Curved 2 x 1 x 2/3 Inverted, Black24201
- 2 x Tile, Round 1 x 1 Half Circle Extended, Black24246
- 12 x Tile, Round 1 x 1 Quarter, Black25269
- 4 x Plate, Round 1 x 1 with Bar Handle, White26047
- 1 x Wedge 2 x 1 x 2/3 Right, Black29119
- 1 x Wedge 2 x 1 x 2/3 Left, Black29120
- 1 x Brick 1 x 2, Black3004
- 2 x Plate 2 x 4, Black3020
- 2 x Plate 2 x 3, Black3021
- 5 x Plate 1 x 2, Black3023
- 1 x Plate 1 x 2, White3023
- 3 x Plate 1 x 1, Black3024
- 7 x Plate 1 x 1, White3024
- 2 x Brick, Round 1 x 1, Black3062
- 2 x Brick, Round 1 x 1, White3062
- 3 x Tile 1 x 2, Black3069
- 2 x Tile 1 x 2, White3069
- 3 x Tile 1 x 1, Black3070
- 2 x Tile 1 x 1, White3070
- 4 x Plate 1 x 3, Black3623
- 1 x Plate 1 x 3, White3623
- 2 x Bracket 1 x 1 - 1 x 1 Inverted, White36840
- 2 x Bracket 1 x 1 - 1 x 1, Black36841
- 1 x Brick, Modified 1 x 1 with Headlight, Black4070
- 2 x Brick, Modified 1 x 1 with Headlight, White4070
- 7 x Plate, Round 1 x 1, Black4073
- 4 x Plate, Round 1 x 1, White4073
- 1 x Brick, Modified 1 x 1 with Studs on 4 Sides, Black4733
- 1 x Brick, Modified 1 x 1 with Studs on 4 Sides, White4733
- 1 x Brick, Modified 1 x 2 with Studs on 2 Sides, Black52107
- 1 x Brick, Modified 1 x 2 with Studs on 2 Sides, White52107
- 14 x Slope 30 1 x 1 x 2/3, Black54200
- 1 x Plate, Modified 1 x 1 with Open O Clip (Horizontal Grip), Black61252
- 1 x Plate, Round 1 x 1 with Bar Handle on Long Stem, Black79194
- 1 x Brick, Modified 1 x 1 with Stud on Side, White87087
- 2 x Tile, Round 1 x 1 with Black Eye with Pupil Pattern, White98138pb007
Where to go next
Want a ready-made model? Open Editions has them to order online, with your print on them if you want it. From 20 kits, shipped within 6 weeks.
Want something designed from scratch? Custom Models.